
If Body Warmth keeps dropping in Permafrost, first leave dangerous exposure and recover at a reliable heat source. At a lit Campfire, open its interaction menu and choose Warm Hands. Then check the current temperature, equipped clothing, Makeshift Heater condition, and active effects before returning to the cold. Use the cold-zone clothing checks when you can recover safely but lose warmth on the next journey.
A heater can slow the loss without stopping it, and a completed shelter does not guarantee recovery. Use the warmth meter to confirm that a change actually helped. Healing Health while your warmth still falls leaves the exposure problem active.
Data version: Numerical recipe or quest entries from MetaBot use its 0.44.2.4634-milestone export. This is a source reference, not confirmation that every entry remains available after later patches.
Stop exposure before diagnosing the equipment
Body Warmth is separate from Health, Hunger, Energy, and Stamina. You can still have a healthy-looking Health bar while the warmth reserve is being consumed. Once Body Warmth reaches zero, continued exposure damages Health and can leave you dealing with Hypothermia as well.
If the meter is already close to empty, return toward a heated location before spending time in inventory comparisons. An animal attack or a fall during that period adds another source of damage while exposure remains active.
Use this order in a dangerous situation:
- Leave the coldest area or reach reliable shelter and heat.
- Confirm that Body Warmth has stopped draining and begun recovering.
- Check Health and the other status meters.
- Repair or change the equipment that failed to cover the conditions.
- Retry the journey only with a restored warmth reserve and a return plan.
This avoids a common loop in which you repeatedly heal, step farther into the zone, and lose Health again because the original cold exposure never ended.
Identify the condition that changed
The same outfit can behave differently after a zone boundary, a change in weather, a worn heater, or the end of a temporary effect. Keep the symptom specific rather than assuming the whole warmth system has stopped working.
| Symptom | First useful check |
|---|---|
| Warmth starts dropping at a Cold Zone boundary | Compare the new temperature with your protection |
| A familiar route becomes harder later | Recheck weather and time-of-day conditions |
| The heater used to help but no longer does | Inspect durability, equipment, and active effects |
| Warmth falls beside a Campfire | Check fuel, ignition, distance, and Warm Hands |
| A roofed room is still too cold for a bed | Confirm actual heat and warmth recovery |
| Health falls while warming up | Check warmth, Hunger, and other damage separately |
Do not infer the cause from the appearance of the surroundings. A bright room can still be cold, and a burning-looking setup is only useful if the heat source is active and your character benefits from it.
Recover at a working Campfire
A Campfire needs fuel and must be turned on. Add Wood to its fuel inventory, light it, and approach the active fire. Then open the radial interaction menu and choose Warm Hands.
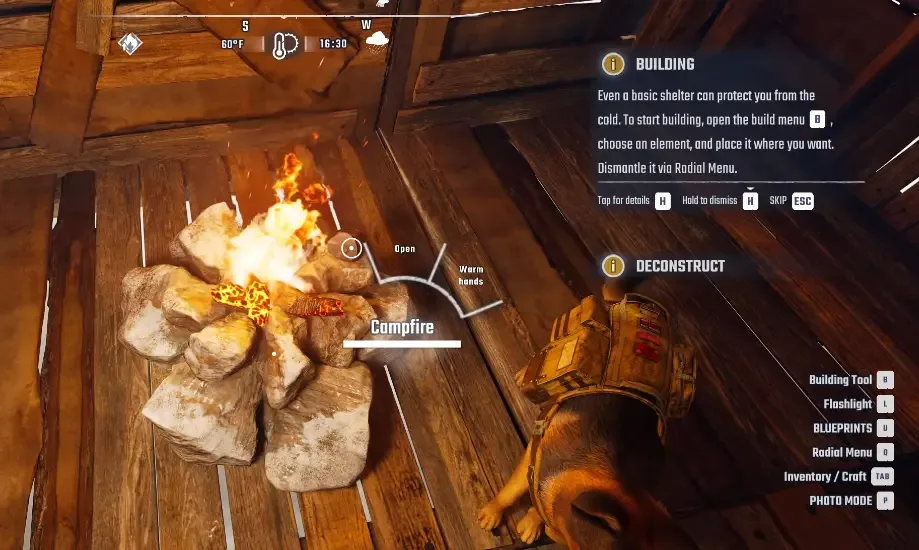
Use Warm Hands and confirm that the warmth meter begins recovering.
Stay long enough to see the Body Warmth meter recover. Lighting the fire and immediately walking away leaves you with whatever reserve you had before the stop. Begin a longer crossing after recovering rather than relying on emergency supplies to compensate for an almost empty meter.
If recovery does not start, check the fire in order: is fuel present, is it burning, and are you close enough to use its warming interaction. This distinguishes an unfuelled or inactive fire from an exposed location where more protection is still needed.
When a fire cannot be placed
Obstructed and No-Build Zone are different placement conditions. An obstructed position may need a clearer or flatter nearby spot. A No-Build Zone restricts ordinary construction across that area, so moving the proposed fire a tiny distance inside the same zone may not solve the problem.
Do not wait until your warmth is nearly gone to discover that emergency construction is restricted. Establish a warming point outside the restricted area when possible and bring portable protection for the exposed stretch.
A Campfire you cannot place is not a usable heat source, even if you carry its construction materials. Choose the nearest workable recovery option instead of continuing to test placement while taking exposure damage.
Check warmth inside the shelter
Walls, a roof, and a door provide a shelter, but the warmth meter still determines whether the resting area is warm enough. At New Home, you can build and claim a bed while the surrounding temperature remains too low for rest.
Check the heat source near the bed. Keep the Campfire supplied and active, use Warm Hands, and let the warmth reserve recover before trying to sleep again. A wall torch can light the room without proving that the rest condition has been satisfied.
If rest remains unavailable, verify:
- The nearby Campfire still has fuel.
- The fire is turned on.
- Your position receives its warmth.
- Body Warmth is recovering rather than declining.
- Another source of damage is not interrupting the rest attempt.
A heated settlement such as Horizon can be useful while your own shelter is unfinished. Do not keep changing the roof solely because a successfully built room still needs heating; the construction outcome and the warmth outcome are separate checks.
Confirm the equipped clothing
Check what you are wearing, not just what you have crafted or collected. Compare the equipment's cold protection with the current environment. Clothing that handled the route outside a Cold Zone may not handle the colder section inside it.
Armor is a separate attribute from Cold Resistance. A more protective combat piece is not automatically warmer. When testing a replacement, equip it and check the resulting cold readout, then look at the meter in the conditions you intend to cross.
You do not need to replace every item at once to diagnose the problem. A useful improvement in one slot can be assessed before you spend the materials for an entire outfit. Keep the warmer existing pieces when a new garment offers no cold benefit.
Inspect the Makeshift Heater
A Makeshift Heater provides portable protection where a Campfire or heated room is unavailable. Its durability is limited. Check that the heater is equipped, has usable condition, and produces the expected active effect before counting it as part of your protection.
A working heater changes how quickly Body Warmth recovers or drains. It can still leave the meter falling in a severe Cold Zone, so slower loss should not be mistaken for unlimited safe exposure. Watch the meter after equipping it and budget the remaining warmth for the trip out.
Repair before a long crossing
Use a Repair Bench for a worn heater. Select the item and inspect the current repair-material icons before leaving base. Carry the required materials rather than assuming that a spare damaged heater solves the same problem.
Repairing the heater before departure is easier than reaching the midpoint of a cold route and discovering that the benefit has ended. If the journey is long and construction is restricted, a functioning spare can be worth carrying when your current heater may not last through the return.
Skinwalker at Hunter's Glade offers heaters through trading, and heaters can also be found among survival supplies. Check what you already own and can repair before buying another. The point is usable protection for the planned route, not the number of worn heaters in storage.
Check food and drink effects
Warming consumables provide temporary help. Improvised Coffee can be useful when Energy is low, while Improvised Tea can help when you need Health recovery. A Warming Dish combines cold protection with a substantial Hunger benefit.
Choose the item for your current need and read its effects before using it. Do not assume every alcoholic drink makes you warmer; Moonshine can reduce Cold Resistance. Consuming the wrong item during severe exposure can undermine the recovery you were expecting.
Check the active status after consuming a warming item. A temporary benefit should not be budgeted as permanent protection for an unlimited journey. If warmth begins falling again, inspect whether that effect has ended before deciding that the clothes or heater have changed.
Check the finished dish before relying on it
The Stove uses Primary and Enhancer ingredient slots. The selected combination determines the finished dish, and not every combination produces a Warming Dish.
If the Stove says Invalid slot for this kind of item, check which position accepts the ingredient instead of repeatedly putting it into the rejected slot. Confirm the resulting dish and its effects before treating it as the cold protection for your next trip.
Reassess the route when conditions worsen
Storms, nightfall, and Cold Zone boundaries can make an otherwise familiar route more demanding. Check the new temperature and the rate of warmth loss before extending your trip into optional looting.
Bunker Checkpoint's exposed upper area and the journey toward Finn's tower are examples of places where the return matters. Reaching the destination does not automatically recover warmth. You still need protection for moving away from it, descending, and reaching heat again.
For a short visit, enter with a restored reserve and functional equipment, complete the intended interaction, and leave while you have enough reserve for a delay. A steadily falling meter is a limited trip budget, not proof that you can remain there until you are done searching.
Verify the fix on the next attempt
After warming up, change the specific condition you identified: repaired heater, a warmer equipped piece, a suitable temporary effect, or a shorter route under better conditions. Retest without changing every part of the setup at once.
The check is whether Body Warmth behaves differently in the same exposure. If it stabilises, the protection is sufficient for those conditions. If it drains more slowly, you have improved the available time but still need a prompt return. If it keeps falling near zero, leave the exposure again.
Keep Health, Hunger, and warmth separate during that check. A falling Health bar beside a fire does not automatically prove cold is the only cause. Confirm the status that is actually deteriorating, then address that condition before the next journey.
Sources and version notes
Sources checked: 12 October 2026. Verification labels refer to the cited documentation and its stated limits; this site has not independently tested these steps in the game. Compare the information with your installed build.
- How to Stay Warm in Permafrost: Heaters & Cold Zones — Third-party gameplay guide. Scope: Warm Hands at active/fuelled fire; portable heater durability; clothing vs Armor; own inventory.
- Permafrost Temperature: Biomes, Heat & Cold Zones — Extracted game data. Scope: Cold zones / shelter / heat / Body Warmth distinction; Cold Resistance and meters.
- WARMTH? :: Permafrost General Discussions — Community discussion. Scope: Shelter/active fire help warmth; historical player advice, not precise current warmth formula.
MetaBot recipe and quest data is attributed to 0.44.2.4634-milestone (Steam build 25834606). It describes that dataset; availability and requirements after later patches still need to be checked in your game.